Building an Art Portfolio Website with Next.js and Sanity
In late 2023/early 2024 I built a portfolio website for an artist. My client had no technical skills, didn't want to be locked into paying subscription fees for CMSs such as Wordpress or Wix, and had a custom design in mind. They also wanted to be able to update the website themselves and not have to go through me every time they wanted to add or remove a photo of their work.
I didn't want to have to build out a GUI and/or implement authentication using vanilla HTML, CSS and JavaScript, and Sanity had a generous free plan. I decided to use Sanity as the platform on which my client could update the website content, and Next.js as the framework I used to build the frontend, since I was already familiar with it. Sanity, thankfully, handles the authentication.
These are the primary guides I used to get started with the project:
- How to Build a Portfolio Site with Sanity and Next.js
- Sanity Webhooks and On-demand Revalidation in Nextjs
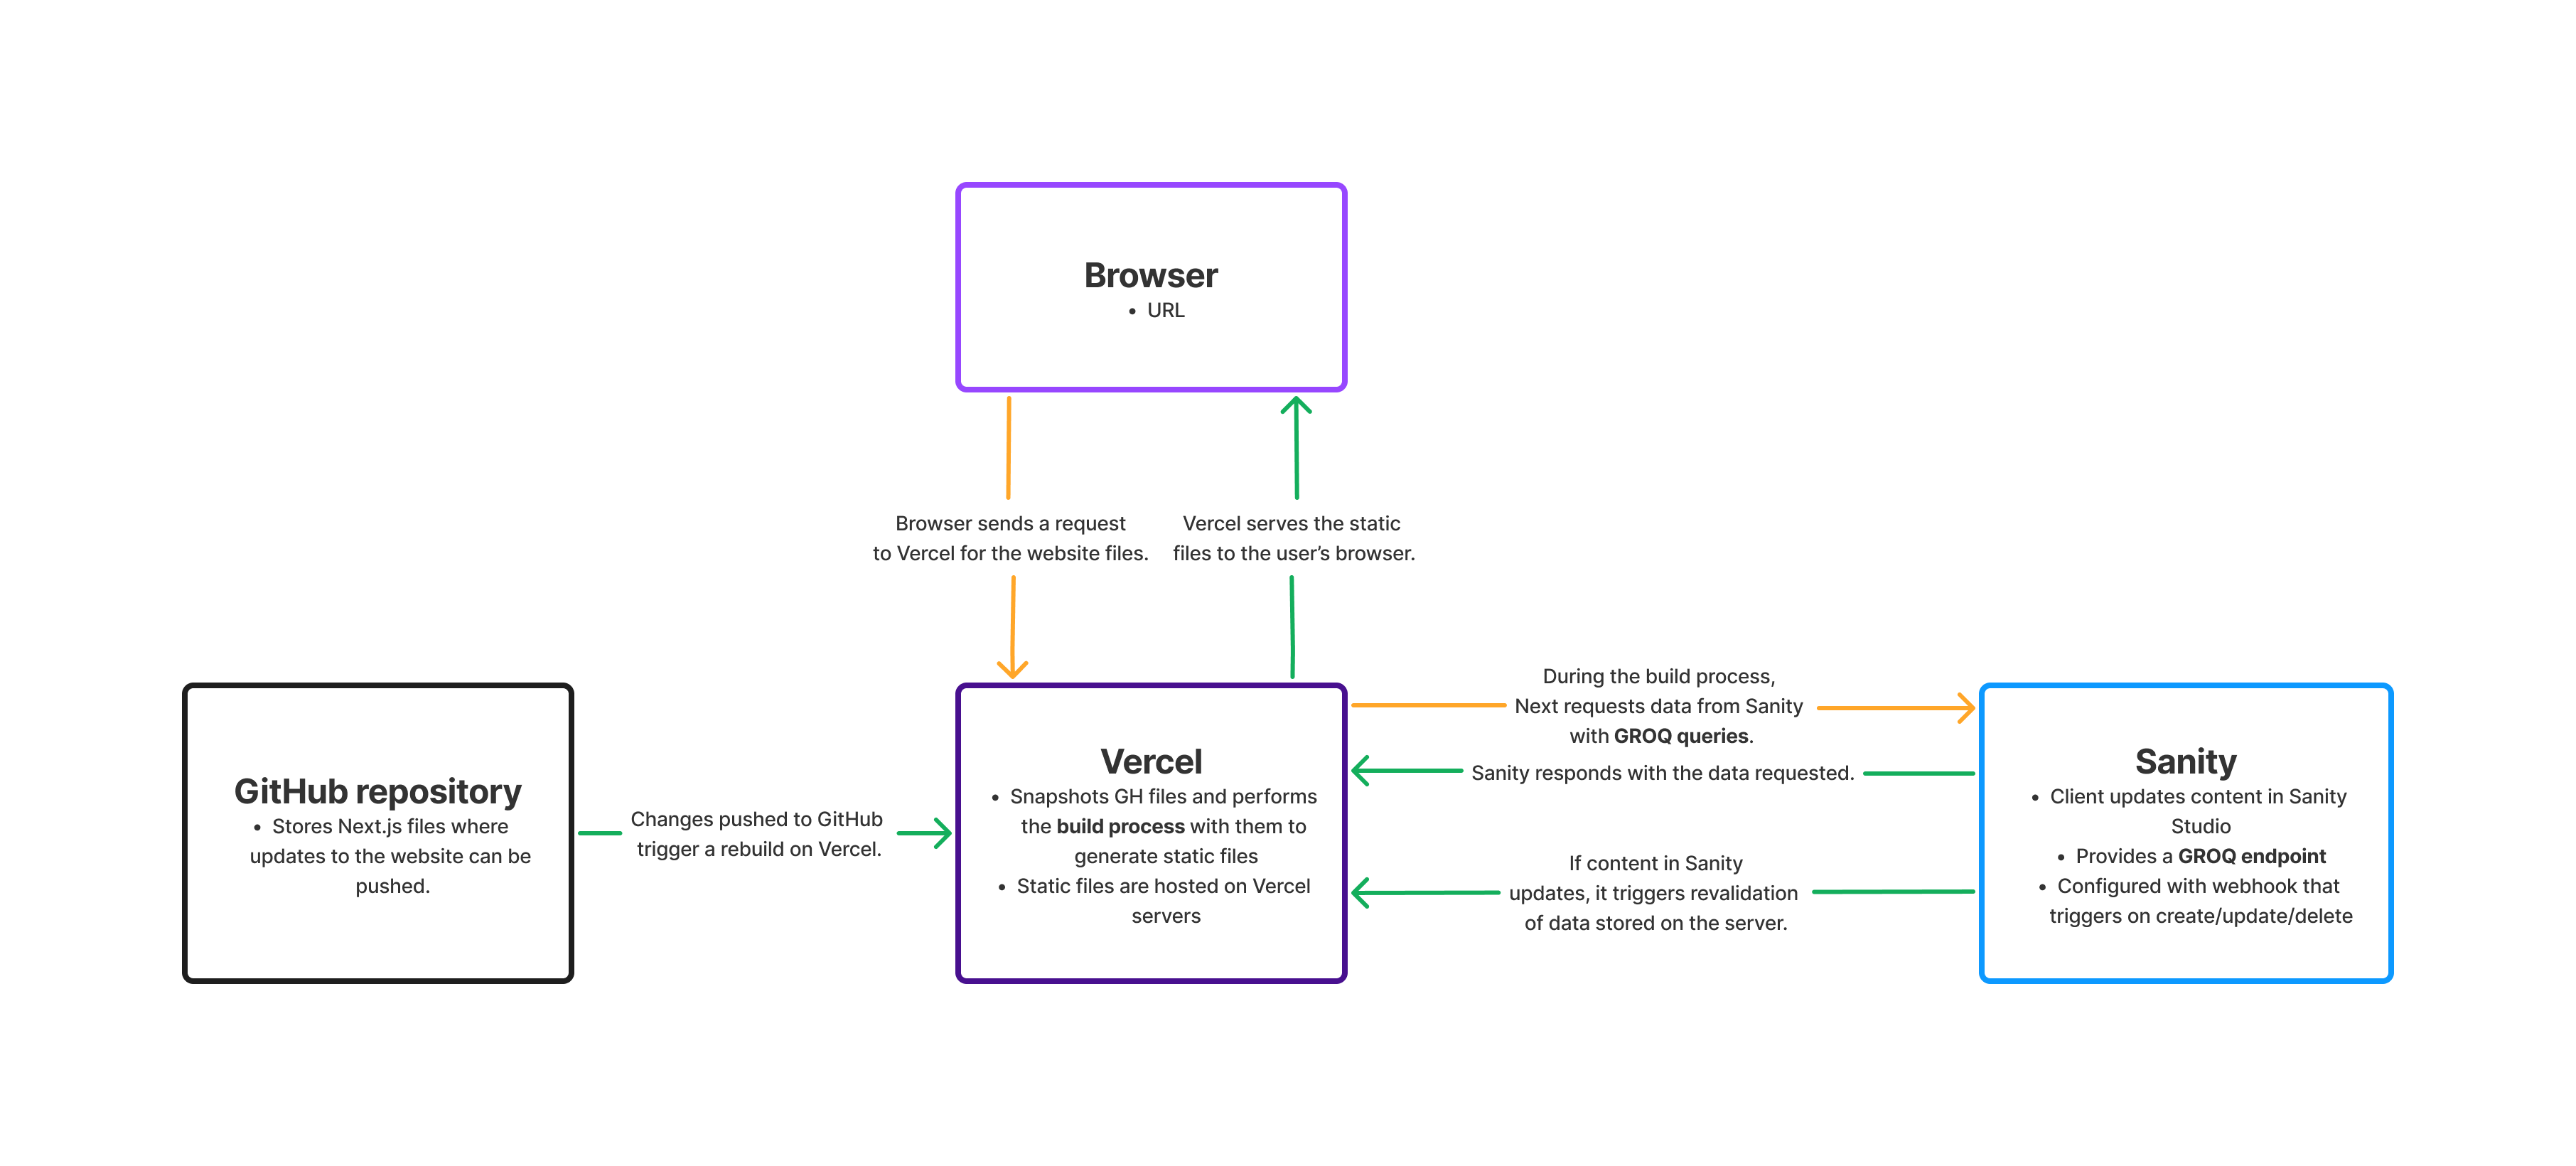
I've created this flowchart to provide an overview of how the website works (right click and open in a new tab for a larger view):
Configuring Sanity
I used the next-sanity toolkit to mount Sanity Studio to the Next.js application, such that it would be hosted with the Next.js app. I configured the base path as /studio in sanity.config.ts, and using Next.js's App routing, implemented optional catch-all dynamic routes for accessing the various studio pages at app/(studio)/studio/[[...index]]/page.tsx. This means that the studio will be accessible at https://www.donnapriceart.com/studio/(+ any additional url segments). Those additional segments are created as follows.
The structure of each section that my client can update are defined in the /schemas directory:
about.ts- defines the structure of the about page, including a page title, slug, image, and description fieldart.ts- defines the structure of an art document, including a title, slug, main image, category, and descriptioncategory.ts- defines the categories of art, with a title, slug, description, and order fieldblockContent.ts- defines rich text fields that can be used in other fields, for example, descriptionsindex.ts- schemaTypes is defined for import intosanity.config.ts(including all of the above schemas), which makes them available to the studio route.
I also have a deskStructure.js file in which art is grouped based on its category so that my client can easily view their art in the studio based on category: this is added to sanity.config.ts via the desk-tool plugin.
Therefore, the following url segments are accessible at https://www.donnapriceart.com/studio/structure, where my client can manage their website content:
- /art
- /about
- /category
- /watercolorMixedMedia
- /oilPaintings
- /illustrations
GROQ (Graph-Relational Object Queries)
The queries used to retrieve documents from Sanity are defined in the sanity/sanity.query.ts file. For example, for a given category, the getArtFromCategory query is used:
sanity/sanity.query.ts:
export const getArtFromCategory = groq*[_type == "art" && $slug in category[]->slug.current] | order(categoryOrder asc, _updatedAt desc){
_id,
title,
slug,
mainImage {alt, "image": asset->url},
category,
description
};
app/(home)/[category]/page.tsx:
const art: ArtType[] = await sanityFetch({ query: getArtFromCategory, tags: ["art"], qParams: { slug: params.category }, });
The art can then be passed to a Gallery component, which handles displaying the art, along with the title and description.
The sanityFetch() function takes both a query and a tag. This tag is useful for data revalidation.
On-demand data revalidation
I wanted my client to see their website update any time they made a change in Sanity Studio, so I used on-demand data revalidation to achieve this.
On-demand revalidation is the process of purging the data cache and re-fetching the latest content based on an event, as opposed to time-based revalidation, that automatically revalidates after a given amount of time has passed. I've used the tag-based approach for this project. See more in the Next.js documentation.
Since the data coming from Sanity has been tagged after fetching it, revalidateTag() is used to revalidate all entries associated with a given tag. In Sanity settings, I created a webhook that triggers when Sanity Studio content changes, and this triggers a POST request to be sent to an API endpoint in my Next.js app. A secret URI is shared between Vercel, where the site is hosted, and Sanity.
This ultimately causes the revalidateTag() function provided by Next.js to run, and any data on the server that was previously tagged with the same tag sent in the POST request from Sanity will be revalidated.
Routing
I used the (home) and (studio) route groups to organise and separate the pages for the studio and the main website. This allowed me to add a root layout for the main website, as well as a root layout for the studio. This was useful because the main website needed a header and additional styling that I didn't want in the studio.
The about page and contact page are defined like so: app/(home)/about/page.tsx and app/(home)/contact/page.tsx.
For the home page, all art is retrieved and displayed in the gallery.
The category pages are generated with dynamic routing: app/(home)/[category]/page.tsx, where each category of art is retrieved using a getCategories GROQ query. The categories are also passed to the navigation component. This way, if my client decides they want to add a new category, they can, and the website will automatically update to include the new category as a route linked in the navigation.
The art for a given category is then retrieved as described above in the GROQ example code.